.png)
How to install GTM on a WordPress site (manually)?
- Ads & Fun Team
- Apr 5, 2021
- 2 min read
What you need:
You must have access to the site admin panel and the rights to edit and publish the theme code;
You must have a GTM account created and GTM code ready to copy and paste ("Where to find your GTM code" if needed);
It is advisable to install the browser extension - Google Tag Assistant (to check if GTM code has been installed successfully);
Steps:
Step 1: Login to your WordPress admin panel (www.[your site].com/wp-admin)
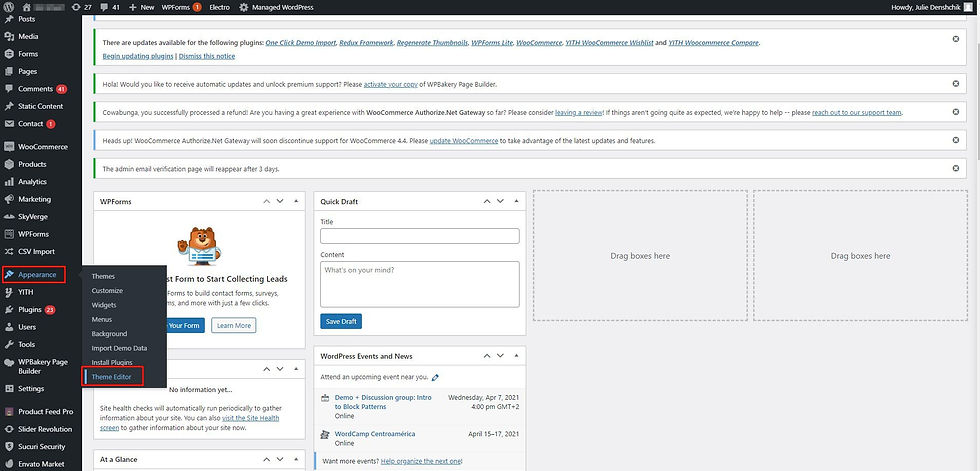
Step 2: Go to “Appearance” -> “Theme Editor” (check "yes, I understand" if asked)
Step 3: In the right menu, find header.php (sometimes it has a different name, for example, header-v8.php in our case).
Note: Sometimes, there may be several header.php files, and you need to choose the correct one. Of course, you can add code to each of them, but this is not very professional :) Better check with your developer if possible.
Step 4: Copy the first piece of GTM code and paste it between <head> and </head> (closer to <head>). Click Update File
Step 5: Go to your website, turn on Tag Assistant (click Enable), refresh the page, and recheck Tag Assistant. You should now see your GTM listed.
See Screenshots:
Step 1: Login to your WordPress admin panel (www.[your site].com/wp-admin)

Step 2: Go to “Appearance” -> “Theme Editor” (check "yes, I understand" if asked)
Step 3: In the right menu, find header.php (sometimes it has a different name, for example, header-v8.php in our case).

Note: Sometimes, there may be several header.php files, and you need to choose the correct one. Of course, you can add code to each of them, but this is not very professional :) Better check with your developer if possible.
Step 4: Copy the first piece of GTM code and paste it between <head> and </head> (closer to <head>). Click Update File

Step 5: Go to your website, turn on Tag Assistant (click Enable), refresh the page, and recheck Tag Assistant. You should now see your GTM listed.

Comments