.png)
How to add Google Analytics to your site using GTM?
- Ads & Fun Team
- Apr 5, 2021
- 2 min read
Note: In most cases, we recommend adding all tracking codes to your site using GTM (including Analytics code)
What you need:
Your site must have GTM installed
You must have an Analytics account, and you need to know its Tracking ID
It is advisable to install the browser extension - Google Tag Assistant (to check if the tag is working);
Steps (see screenshots below):
Step 1: Log in to your GTM account and select the desired container (https://tagmanager.google.com/).
Step 2: Go to the "Variables" section. In the "User-Defined Variables" section, click the button "New".
Step 3: Give a name to your variable. Click on “Variable Configuration” and choose “Google Analytics Setting”
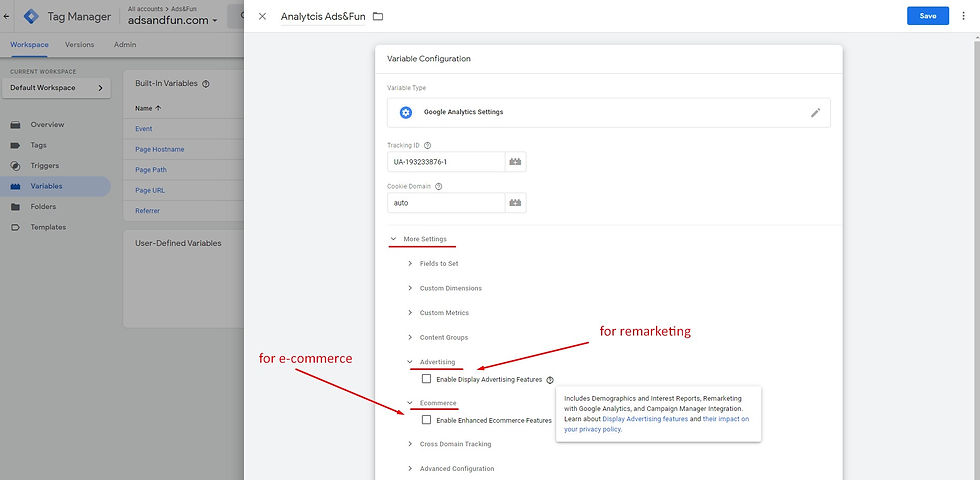
Step 4: In the “Tracking ID” field, enter your Google Analytics ID (it looks like UA-123232323-1).
Step 5: (optional) Go to Advanced Settings -> Advertising -> check “Enable Display Advertising Features” if you plan to use remarketing. Save.
Step 6: Go to the "Tags" section. Click the button "New".
Step 7: Click on "Tag Configuration" and select the "Tag Type" "Google Analytics: Universal Analytics" (or your Analytics type, if yours is different).
Step 8: In the "Google Analytics Settings" field, select the variable you created earlier.
Step 9: Click on “Triggering” and choose trigger “All pages”. Give a name to your tag. Click Save.
Step 10: Click the "Submit" button, fill in the information about the changes (it doesn't matter what you write), and click the "Publish" button.
Step 11: Go to your website, turn on Tag Assistant (click Enable), refresh the page, and recheck Tag Assistant. You should now see your Analytics listed (tracking ID).
See Screenshots:
Step 1: Log in to your GTM account and select the desired container (https://tagmanager.google.com/).

Step 2: Go to the "Variables" section. In the "User-Defined Variables" section, click the button "New".

Step 3: Give a name to your variable. Click on “Variable Configuration” and choose “Google Analytics Setting”

Step 4: In the “Tracking ID” field, enter your Google Analytics ID (it looks like UA-123232323-1).

Step 5: (optional) Go to Advanced Settings -> Advertising -> check “Enable Display Advertising Features” if you plan to use remarketing. Save.
Step 6: Go to the "Tags" section. Click the button "New".

Step 7: Click on "Tag Configuration" and select the "Tag Type" "Google Analytics: Universal Analytics" (or your Analytics type, if yours is different).

Step 8: In the "Google Analytics Settings" field, select the variable you created earlier.

Step 9: Click on “Triggering” and choose trigger “All pages”. Give a name to your tag. Click Save.

Step 10: Click the "Submit" button, fill in the information about the changes (it doesn't matter what you write), and click the "Publish" button.

Step 11: Go to your website, turn on Tag Assistant (click Enable), refresh the page, and recheck Tag Assistant. You should now see your Analytics listed (tracking ID).

Comentários